title

title

Saturday 23 February 2019

Game 309: Helynna vs Borka2


Game 309 – Vs Gary Stewart – Trollbloods – 17/02/19

My list:
Magister Helynna (Forges of War)
-Chimera
-Discordia
-Manticore
-Manticore
-Manticore
Dawnguard Trident
Dawnguard Trident
Arcanist Mechanik
Arcanist Mechanik
House Shyeel Arcanists
-Soulless Escort

His List:
Borka, Vengeance of the Rimeshaws (The Power of Dhunia)
-Trollkin Runebearer
-Earthborn Dire Troll
-Mulg the Ancient
-Rok
-Storm Troll
-Troll Axer
Troll Whelps
Troll Whelps
Max Krielstone Bearer & Stone Scribes
-Stone Scribe Elder
Swamp Gobber Bellows Crew

Another 
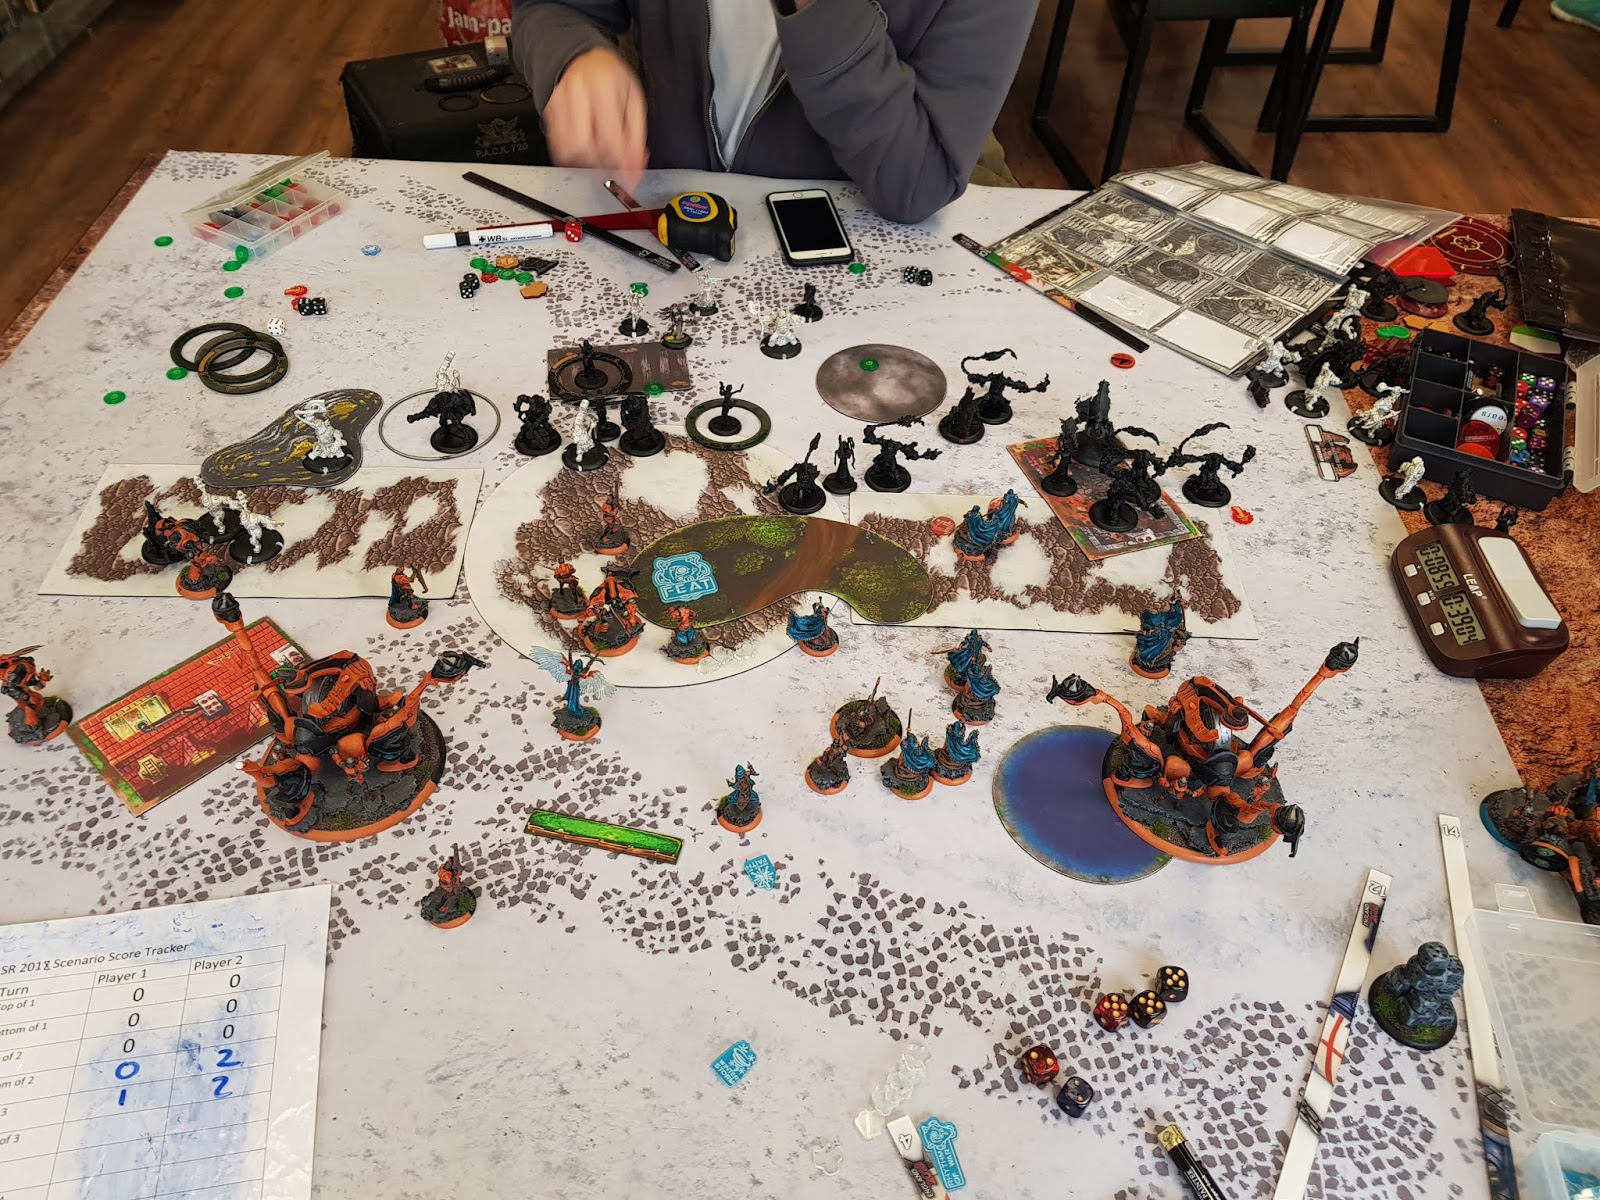
practice game with Helynna and I’m up against Borka2 again, but this time in the Beast theme. My game plan will be much the same as it was against Rob, but with three differences. Firstly, the beasts threaten a bit further as Gary has a Troll Axer for Rush. Secondly, we are on a much more live scenario than before and thirdly, I don’t win first turn this time. With some issues to play around, we get moving.
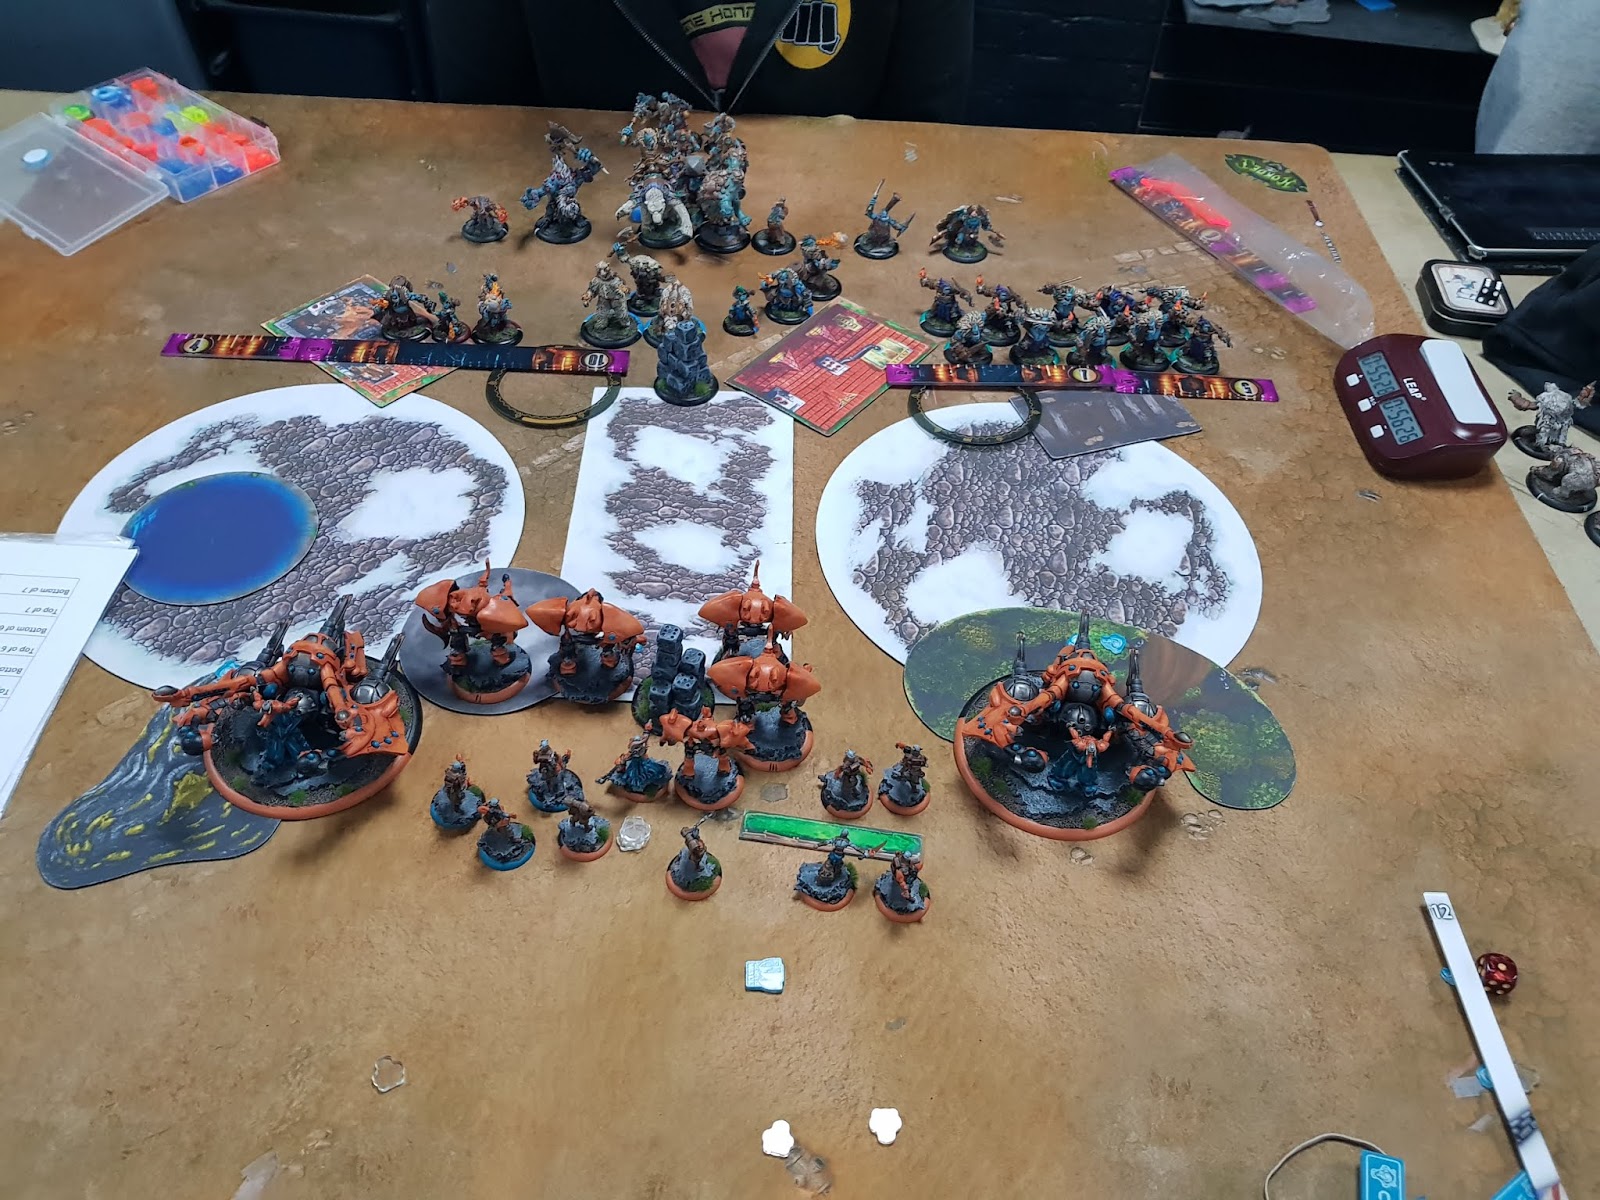
Borka puts up Counter-Charge and Snow Shroud and fuels the stone before everything runs forward.

I get up the table as far as safely possible. Neither Earthborn has a speed boost at the moment so the threat ranges are fairly manageable.


Gary Feats with Borka and moves his battlegroup up, putting the Earthborn animus on himself (as he would for the rest of the game). He moves a Whelp to the right flag to allow him to score in my turn.

One of the weaknesses in this list is not really having anything to score flags, so I have to take an Arcanist out of the right to do so. This turn is a lot of awkward positioning. I largely back off to avoid having to Feat, giving up some scenario presence in return for a turn of safety. To counteract this, I am able to charge a Trident up on the left, take out the Gobbers and a couple of Whelps before repositioning out of range of the Earthborn. I lead 2-1.


Gary is uncertain how to play this turn, as I don’t think he expected me to back off so aggressively. He charge the Axer into my left Trident, leaving it on 8 boxes, before pushing up with the rest of his battlegroup, hoping to overwhelm me with targets. 2-2.

This is the turn where I need to get work done, and I don’t do particularly well. The Earthborn on the right being Defence 16 against my shooting means the Trident doesn’t get much damage on it, and the Manticore I commit can’t finish it off due to having to boost to hit. On the left things go better, the Trident takes out the Axer, and Discordia and the Manticore combine to take out a Hand of Fated Mulg. 3-3.


Gary does what he can into my feat, but struggles to get too much damage done. The right earthborn gets Primal and reduces the Manticore to around 8 boxes, the left tickles Discordia a bit, and Rok walks through the forest to kill the Chimera. 4-4

Here we go, its been a long time since I had to write up a turn I played this badly. It should have been simple, kill 2 heavies, leave just Rok alive and stroll to victory. Instead I triggered Counter-Charge on Borka, who hit the Crit-Smite on my fully fuelled Manticore, as a result the left Earthborn survived to threaten me next turn. Then some pretty bad dice (Trident midding a boosted 8) meant that the right Earthborn just wouldn’t die, taking my entire right flank to remove it. I do clear the top left zone through to at least pull ahead 6-5 on scenario.


Time to see if I get away with my mistake or not. Helynna is behind a wall with 3 Focus so essentially a 17/20 caster but this could still easily go wrong. Gary plays it well, clearing out the blocking Manticore with Rok before putting Primal on the Earthborn and sending him in. He rolls pretty well on the assassination, hitting 2 of 3 unboosted 9s to hit, but some slightly under average damage rolls mean I survive with a single box, for the second time in a weekend. The game is over here, as I would go 2 CPs up in his turn (the assassination was his last activation) and would just need to clear my right zone to win.


VICTORY

I played a lot of this game really well, before completely falling apart at the end. I could easily have got both heavies onto the Earthborn without triggering Counter-Charge but just forgot about it and nearly threw away a really strong position. I really enjoy playing Gary, and he’s becoming a really strong opponent in what is a great Merseyside meta. I won’t have too many more games before the York event, and then after that I will be building towards the Welsh and then the WTC. Garryth2 coming out means it’s a really exciting time for the faction and there seem to be so many options at the moment. Its now been 40 games since I last played Vyros2, I feel like I need one of those Alcoholics Anonymous badges.

Game 308: Garryth2 vs Deneghra1


Game 308 – Vs John Tavernor – Cryx – 17/02/19

My list:
Garryth, Eye of Vengeance (Defenders of Ios)
-Harpy
-Harpy
-Moros
Arcantrik Force Generator
Arcanist Mechanik
Lys Healer
Eiryss, Mage Hunter of Ios
Heavy Rifle Team
Heavy Rifle Team
Max Ryssovass Defenders
Max House Ellowuyr Swordsmen
-House Ellowuyr Swordsman Officer & Standard

His List:
Warwitch Deneghra (Slaughter Fleet Raiders)
-Satyxis Blood Priestess
-Nightmare
-Nightwretch
-Ripjaw
Axiara Wraithblade
Eilish Garrity, the Occultist
General Gerlak Slaughterborn
Max Black Ogrun Smog Belchers
Max Blighted Trollkin Marauders
-Jussika Bloodtongue
Max Bloodgorgers
Cephalx Overlords
Sharde Dirge Seers

A couple of games on a Sunday afternoon, the first testing my slightly adjusted Garryth2 into Cryx, in particular into a Deneghra Slaughter Fleet list. John won the first turn and we got moving.

After my Advance Moves John runs everything forward, staying mostly out of my pretty significant threat ranges.


John had accidently positioned one model (an Overlord) in my threat range, but that’s all Garryth really needs. I move up, put down a Mage Sight and cast Road to War, before taking the shot and removing the model. This allows the left Harpy to move forward and kill one of the Smog Belchers that had previously been out of threat. Everything else runs up.


Deneghra arcs a Crippling Grasp onto my Ellowuyr and the Smog Belchers open up into them with their guns, building a cloud wall in the process before Repositioning back. The Bloodgorgers run up behind and toe the zone. On the right John moves up fairly cautiously, and redeploys Nighmare to help out on the right.


This needs to be Garryth’s Feat turn, but I don’t think I can afford to aim for the extra Control Range. This is because I want to put down a Mage Sight on the two models that are in the zone to allow me to start scoring on the left. I shoot one off with Garryth before opening up with my guns on the left, taking out the objective, clearing the zone, and shooting the Arc Node off the Ripjaw. On the right I take out as many Marauders as I can, and am able to take out Jussika due to a mispositioning by John. I score to lead 2-0.


John decides to mostly hold off on my Feat, just using his guns to deal what damage he can. He does charge in a couple of Marauders, some being taken down by my Feat and some dealing damage into my forward Harpy, taking out the gun. John takes out my objective to close to 2-1.


I expected a defensive Feat from Deneghra last turn, but John clearly wanted to hold it for the offensive benefit as well, so I have this turn to deal as much damage as I can. I do a pretty decent job, with Mortality going on the Marauders and allowing my Ellowuyr to reliable Cleave through them. I fail to take out the Ripjaw but leave it on a single box and out of Deneghra’s Control range. On the right the AFG and Ryssovass are slowly grinding away, crucially taking out the second Arc Node. The score stays 2-1.


John does Feat this turn, clipping most of my army, but he doesn’t really have enough models left to capitalise on it. He takes out Moros, the rest of my Ellowuyr (apart from the Prey buffer at the back) and most of my Ryssovass. John clocks this turn, the time taken to play round my Feat really took it’s toll. We decided to play on regardless as the game is interestingly poised. John moves into a 3-2 lead.


At this point the game will be decided by who can keep contesting the zones the longest, so I just clear out what I can, scoring the left zone to level at 3-3. The two remaining Rysovass charge Nightmare and cut out it’s Cortex, significantly reducing it’s threat.


John clears the right and central zones, contesting the left to move 5-3 ahead on the top of turn 5. I need to pull this back quickly but I think I have time on my side.


I shoot off all the models in the centre and left, leaving John with only one model that can really ever contest the left again. I score twice to close at 5-5 again.


John needs to clear my whole HRT unit in the centre, and with the Overlord failing he has to commit Deneghra to within 14” of Garryth to do so. He does remove the unit to score the zone again to lead 7-5 on the top of 6.


I am confident that I can grind it out from here as I can shoot off Eilish with a Harpy and from there John can never contest the left again. Moving the AFG into the central zone would shut down him scoring that, meaning the right would be his only avenue, and I would have enough models around to contest it long enough to win. But with Deneghra in range of Garryth I can’t refuse the assassination. The AFG moves to within 5” of the Overlord and slams it into the Caster. After a Mage Sight, Garryth’s Armour Piercing shot leaves her on a couple of boxes, and the Harpy moves in to finish her off.


VICTORY

I’ve never been one to love the long grindy games that really appeal to some people (I’m looking at you, Haley3 players), but Garryth2 seems to be really good at them, and I finally have a caster that I’m enjoying in that style of game. I really like the list now with the second HRT and one of each melee unit, and the Ellowuyr are doing just enough to keep their place for the time being. John was a great opponent through this game, and it was nice to get revenge for the SR final I lost to him at the start of the year.

Game 307: Helynna vs Borka2


Game 307 – Vs Rob Brown – Trollbloods – 15/02/19

My list:
Magister Helynna (Forges of War)
-Chimera
-Discordia
-Manticore
-Manticore
-Manticore
Dawnguard Trident
Dawnguard Trident
Arcanist Mechanik
Arcanist Mechanik
House Shyeel Arcanists
-Soulless Escort

His List:
Borka, Vengeance of the Rimeshaws (Storm of the North)
-Trollkin Runebearer
-Earthborn Dire Troll
-Pyre Troll
-Rok
Fell Caller Hero
Valka Cursebor, Chieftain of the North
Max Krielstone Bearer & Stone Scribes
-Northkin Elder
Northkin Bear Handlers & Battle Bears
Northkin Fire Eaters
Max Northkin Raiders

Second practice game with Helynna and I’m up against Borka2 played by my clubmate Rob, who inexplicably had avoided being on this blog up to now. I win the first turn and we get moving.

Helynna puts up Deceleration and everything gets up the table, with Rhythm of War allowing everybody to get into Discordia’s Kinetic Field bubble for some extra armour.


I’ve kept my support far enough back to be out of the Fire Eater’s threat (as much by luck as by judgement) and so they get lit up by the Pyre Troll and set some of my Jacks on fire. Other than that he gets up the table, with the Bears taking the snow drift to give themselves Stealth. Borka Feats.

Much like the last game, I don’t want to Feat this turn. If I can hold back just out of threat I can then take a strong attrition position next turn. I shoot off the Fire Eaters that had come forward, and Discordia sprayed down the conga line of Bears and Handler, killing one bear and Deafening the leader. She was then Slipstreamed and Rhythmed back to safety. I shoot off a handful of Raiders.


I had left both Tridents just within range of the ambushing bears, doing rough maths to work out that they shouldn’t kill it. And I was right; the unit ambushing on the left and rolling fairly well to leave me on 7 boxes. What I hadn’t calculated was Rob killing the Deafened leader, allowing the last Bear in the unit to charge and finish it off. Rob then turned to an attempted assassination, with my caster being on zero camp (probably an error). 2 Fire Eaters could get sprays on her, but one was killed by Covering Fire and the second missed. Rok’s spray made contact and left her on a handful of boxes, so Rob went all in and went for Borka’s Sprays. The first hit and left her on a single box, with the second (unboosted and needing a 10) thankfully missing. I survive the turn. 0-0


Despite Borka being right in front of my with no Fury, this still isn’t a trivial assassination as he ran up with everything he had to jam me. Eventually I solve the problem by smiting the Earthborn at Borka with a Chain Attack from Discordia, knocking him down and clearing a route for a Manticore to finish him off.


VICTORY

My mistake this game was thinking I needed Hand of Fate to take out the Fire Eaters. This cost me three focus on Helynna, but my jacks would still have easily been able to remove them. With 3 extra Focus (and ideally being in range of Kinetic Field) the assassination would never have been on. As it was, I had to rely on a bit of good luck to survive. Rob was a great opponent and we have a lot of fun in this game, Helynna isn’t as bad as I feared.

Game 306: Helynna vs Harbinger


Game 306 – Vs Nick Hancox – Protectorate of Menoth – 15/02/19

My list:
Magister Helynna (Forges of War)
-Chimera
-Discordia
-Manticore
-Manticore
-Manticore
Dawnguard Trident
Dawnguard Trident
Arcanist Mechanik
Arcanist Mechanik
House Shyeel Arcanists
-Soulless Escort

His List:
The Harbinger of Menoth (Exemplar Interdiction)
-Hierophant
-Reckoner
-Sanctifier
Exemplar Bastion Seneschal
High Exemplar Gravus
Scrutator Potentate Severius
-Dervish
Min Choir of Menoth
Max Exemplar Bastions
Max Exemplar Cinerators
-Exemplar Cinerator Officer
Max Exemplar Errants
-Exemplar Errant Officer & Standard

At the recent UK Invitationals two things came to light. The first was that my 3-2 performance was enough to get me a place on England Roses for the upcoming WTC, and I am delighted to be back on the team for another year. The second was that I lost a bet, resulting in my having to play Helynna at the next 2 day event I play in, which will be in York in early March. Not wanting to go in completely unprepared I wrote up a list that is similar to her old style, but with the additional tricks that we can pull now that we have the Trident and Discordia in the Forges theme. My first practice game is against Nick with his Menoth, and with me getting the first turn we get moving.

With Rhythm of War starting in play from my theme benefit, and Deceleration being pretty much useless due to all the Blessed weapons I don’t need to do anything with Helynna this turn, so everything just runs up the table, with Discordia putting out her Kinetic Field.


Harbinger also doesn’t have much to do with her Focus on turn 1, and so just gets up the table. Nick takes a few shots with Errants into my lines but gives up when he realises they are going to be pretty useless following my Feat.

I really want to hold my Feat for a turn, and so I decide just to hold back and shoot, putting some Covering Fire in front of the Errants. A number of the Bastions are out of Martyr range, so they go down quickly, with Nick choosing to save health on Harby rather than overly Martyr the rest. I Rhythm back to relative safety and hope that I survive the next turn in reasonable shape. On the left my Trident shoots off the Dervish.


The reasoning for Nick not Martyring the Bastions much was so that he could use his health resource to charge the Errants through the Covering Fire before my Feat was up. He does so and between them and Gravus they take a huge chunk out of one Manticore, and chip some damage onto another. The Cinerators move up on the left but it doesn’t feel that that will be where the game is won or lost. Harbinger ends the turn on around 10 health and with the score at 0-0.


The key for me this turn is to clear out the front line, take out the objective and Feat to really blunt Nick’s response. I know how much Nick wants to keep Gravus alive, so punch him down until he can’t afford to Martyr any more. I move the Reckoner in closer with a push from Helynna and a Smite from the left Trident, who also rolls some hot dice to take out the objective. The rest of my Battlegroup clear out the Errants and the right Trident pushes up to deal some damage to the Sanctifier. I score 2 to lead 2-0.


Nick now has the unpleasant task of playing an uphill attrition game into Helynna’s Feat. He puts every attack he can into my Tridents, but can only reduce both of them down to 5 boxes. In realisation that the game is lost, he tries to see if Harbinger can finish them both off. He rolls the boosted 12 needed to take out the right, but cant get close enough to get the Pow needed on the left, and leaves it on a couple of boxes. With Harbinger on no camp and 2 boxes in front of my army, Nick concedes.


VICTORY

Nick is new to Harbinger and probably didn’t play a perfect game here, but I was still really pleased with how I dictated the pace of the game and held my Feat back an extra turn. Doing do would have essentially given me two full turns of attrition, which was more than enough to win the game. I really enjoyed playing the list, which is a real change form how boring I found her pre-CID, so I was looking forward to getting in some more games.

Tuesday 12 February 2019

Game 305: Garryth2 vs Old Witch 2


Game 305 – Vs Jonny Jennings – Khador – 10/02/19

My list:
Garryth, Eye of Vengeance (Defenders of Ios)
-Harpy
-Harpy
-Moros
Arcantrik Force Generator
Arcanist Mechanik
Lys Healer
Eiryss, Mage Hunter of Ios
Heavy Rifle Team
Max House Ellowuyr Swordsmen
-House Ellowuyr Swordsman Officer & Standard
Max House Ellowuyr Swordsmen
-House Ellowuyr Swordsman Officer & Standard

His List:
Zevanna Agha, the Fate Keeper (Wolves of Winter)
-Rager
-Ruin
Greylord Forge Seer
Koldun Lord
Koldun Lord
Doom Reaver Swordsmen
-Greylord Escort
Doom Reaver Swordsmen
-Greylord Escort
Doom Reaver Swordsmen
-Greylord Escort
Doom Reaver Swordsmen
-Greylord Escort
Doom Reaver Swordsmen
-Greylord Escort
Min Greylord Outriders

Second game with Garryth2, and my first against the new reworked Doom Reavers, played by Jonny and led by Old Witch 2. Jonny won the roll to go first and we got moving.

Witch puts up her 18” Wind Wall and the everything runs up the table. It is a pretty daunting sight to be honest.

I am far more scared of the Outriders than I am of the Reavers due to their magical sprays, so I push up on the right flank whilst holding back on the left, hoping that things would look better over there next turn. Garryth casts Road to War allowing him to kill on Doom Reaver and a Harpy to kill a second. It’s a start I guess. The Ellowuyr on the right use their Mini-Feat.


I was so pre-occupied with the sprays from the Outriders that I completely forgot that UAs have them as well. I lose 8 Ellowuyr from my right unit to the mistake. Aside from that Jonny pushes up, not wanting to commit too much into my guns, and the Outriders run hard up the left flank, putting my in real danger next turn.

I have to deal with them, so the left AFG turns to see two of the unit, hitting one of the 8s required to kill them. My Ellowuyr go pretty crazy this turn, Cleaving through a lot of Doom Reavers, and (along with shooting from the Harpies and right AFG) removing 3 of the UAs to reduce the incoming sprays. Garryth Feats to make it very difficult for Jonny to deal with my forward models. I don’t score the zone I cleared, because I’m great at this game. 0-0.


My Feat stops most of Jonny’s retaliation on the right with Garryth even shooting off one of the Doom Reavers. Ruin is pushed out of the zone by a Harpy but still kills a couple of Ellowuyr. On the left Jonny casually reduces the armour of the AFG by 4, and reduces it to 7 boxes with a couple of attacks. Nobody scores 0-0

Doom Reavers are one of those opponents where it is difficult to see how well the game is going, but I definitely feel that I’m in a good position at this point. I take out the Rager, making Witch very scared of Eiryss, and keep everything important out of range of Ruin. On the left I continue to grind through the infantry, and in the centre Moros does great work working through the support solos. I score the right zone to lead 1-0


Jonny clears the left zone by finishing off the AFG, and runs his last Outrider into my backfield to threaten my support next turn. Ruin continues killing what he can, but Jonny’s momentum has gone now. 1-1


The game is really a clearup from this point. Garryth and the AFG take out Ruin, my HRT turns round to finish off the Outrider and the Harpies shoot the objective. At the end of the turn I have a 4-1 lead and Jonny has the Witch, a Koldun Lord and one Doom Reaver. He concedes.


VICTORY

Going into this game I thought the matchup was pretty good, but then when Jonny started pulling magical sprays out of every orifice I realised I was in real trouble. But the list worked, you don’t need a lot of Ellowuyr to survive in order to grind through the Reavers and Cleave is almost equivalent to Berserk once you have two players spacing properly. The difference was that I had enough guns to make the difference, and Road to War was huge in making up the range deficit created by Wind Wall. I definitely don’t think that this list is the finished article, Ellowuyr just aren’t worth 21 points in their current state, but as a framework I’m really happy with the list.